Search This Blog

Monday, July 12, 2010

Bird Houses 2D and 3D Grade 2/3


I loved the gorgeous bird houses Patty Palmer had on her blog Deep Space Sparkle. So we created our own. We dyed our backgrounds with edicol ( food colouring). The Bird houses were painted with tempera paint block paint and finished them with sumi-e ink.
I alway love to make 3D artworks with the students and so came up with the idea of using a milk or juice cartons . I trimmed the top of and retaped them to create the bird house shape. I cut and glued a seperate roof onto the top of the carton . ( this takes up quite a bit of time as the students cant do this. I had the help of a high school student who is in work place training. Using a very thick white acrylic paint painted the cartons white. The students then painted and decorated them in bright tempera paints. . My next problem to solve was how to display them- I have come up with two ideas. Using very large Popsicle sticks ( more like tongue depressors) which are set in a plastic cup of plaster- a hole is cut in the bottom of the carton just big enough for the tongue depressor. They may require gluing using a hot melt glue gun to hold in place. This is suitable for small cartons. The large ones I have decided to hang for display with fishing line.

Tuesday, July 6, 2010

Mini Miros Yr 2/3s, 7- 8years age


Ever have one of those days you don't know what to do. Searching through my favourite blog sites I came across an art lesson on Joan Miro- posted on Deep Space Sparkle.
Not many materials required, art appreciation included and just enough time to get started. I have some good resources I collected over the years including calendar images which I purchase in February when they go out at least 1/2 price and when my friend who has a calendar shop gives me the ones she has not sold for free. I had great memories of the fantastic retrospective exhibition of Miro's held at the Centre Pompidou Art Gallery in Paris in 2004. It was the highlight of my trip along with Monet,s garden which was blooming in May. The children had lots of fun creating their drawings in draft form on cartridge paper and using felt pens. I searched my storeroom and found some offcuts of Mattboard used for making picture matts/frames. I cut up enough for each student and handed out black fine liners to the children. They drew their lovely whimsical characters and other little icon Miro shapes such as stars, suns, moons and eyes. To colour the main shapes I handed out metallic markers and the Faber Castell Colour burst pens for them to complete their works. I then mounted them onto to some black card for display. The photo shows some of them as display at our annual district art display ART BLAST - which showcases the artwork of thirty primary and secondary schools.

Graduation Canvas Year 7/s 12-13 yrs


I began a tradition 5 years ago that when students leave our school to enter high school they create a canvas which incorporates their image and also some graphic work incorporating their name in a unique style and words that may describe them. I started off by photographing them and then Photo shopped their faces into Warhol style black and white images. Originally I would cut stencils but found as the school grew this was too huge a task and now we carefully glue a photocopy of their face onto the canvas.
Over the past few years the project has evolved where now the students have selected their own lettering style- I use Dafont.com as a source for funky fonts. The three examples demonstrate 3 completely different approaches to the canvases and individual style.
To complete the project the students paint the backgrounds with a quality acrylic and I seal with a clear polymer.

Tyvek Pirates 6-8yrs


PIRATE FOLK TYVEK
I just love pirates as a theme for my little ones. When the classroom teacher told me she was using it as her theme for literacy I jumped on board literally. We completed some drawings but I knew that the Tyvek soft sculptures would be a hit.

By Luke age 6 years

Materials
Felt for hats or fabric for bandanas, wool tops unspun sheep’s wool, or knitting wool for hair, acrylic paint, sequins, leather scraps , wire soft to make hook, thick -wood skewer/dowel for peg legs, permanent markers/sharpies . template of female and male pirate, And template for hat - PVA Glue/ hot melt glue gun, Fibre fill for stuffing.
Tyvek- White For those of you who don’t know what this is (a plasticized paper fabric made by Dupont- used in construction insulation and for throw away overalls etc. It is fantastic for kites etc. Can be painted (wipe off if a mistake is made. Use permanent markers on and it can also be glued or stitched. It is strong and tough. -approx ½ metre or yard per child. I used an A3 template which I drew as a guide. Costs about $4 per metre /yard in Australia and is very wide.
Technique –
1. Cut out template and trace enough fronts and backs for students. I cut out the pirates for the children due to they age.
2. Inspire students. Best book around but it is an oldie is by Colin and Jacquie Hawkins- Pirates. Plenty at Amazon plus many other books.


3. Students to paint their pirates front and back to match each other- this can be challenging but worth pursuing. Use the acrylic paints and allow drying. Don’t ask them to paint facial features. These are drawn in afterwards with felt pens. While these are drying begin pirate maps.
4. When dry glue front and back along edges with PVA. Teacher or helper needs to do this. Leave opening for filling. Students then draw in details of faces, hands , jewellery etc,
5. Make hooks from leather see template. Glue wire onto one side of leather with hot melt glue gun. Then glue onto arm with other side using PVA
6. Make peg legs if required from leather and skewer. In similar way to hook arm.
7. Decorate head, with beard, hair etc. I found some gorgeous lumpy knitting wool for this plus the black wool tops etc. Glue on with PVA
8. Use sequins for jewellery- May need Hot melt glue for this.
9. Cut out Hats from felt and decorate- Glue on front and back.
I found some pirate skull fabric and cut that out to decorate hat.
10. Once decorated fill with stuffing and glue together. Use a clothes peg to hold together while drying.


These will be a huge hit with the younger children
Use this same idea for making scarecrows, and fairies, elves, self portrait soft sculptures animals, Monsters etc.

Monday, July 5, 2010

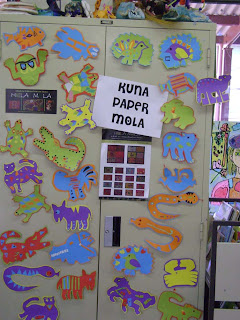
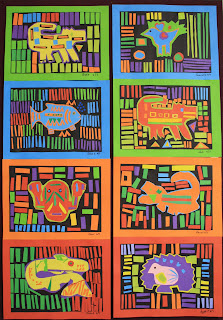
Paper Molas Year 4/5s 8-11yrs


Wow these paper molas really extended my students. After showing the students real molas we practised making small ones based on traditional designs of the Kuna culture with the influences of the modern world. Mola art developed when Kuna women of the San Blas Islands in Panama had access to bright colour fabrics.
How to make.
Colored card
Use primary and secondary to create Complementary colour schemes.
Glue sticks,
Images of traditional designs.
Scissors.
Step one students draw or trace around templates of animals etc using a primary colour.
I made about 15 animal -bird , fish shapes - but more capable students could create their own,. Once traced - cut out and glue onto an A5 size piece of paper . Students can choose its complementary colour as the background. Students then trimmed leaving about 4-5mm or around 1/4 inch.
Glue the animal shape onto a rectangle of black paper A4 size.
Stduents then decorated the the animal and filled in the background with small rectangles, paper punched dots as required. etc

Sunday, July 4, 2010


Amate Painting.


Thankyou Patty of Deep Space Sparkle fame - For inspiring me with your ornate bark paintings. The kids just loved this activity and led me on an incredible journey discovering Mexican paper crafts. My husband brought home from the US a couple of original Amate paintings and we researched on the internet lots of images for the students to use.
Here are four artworks the kids created. To finish our works off we embellished the paintings with Faber Castell opaque pens- In the United States they are called colour burst paint pens.

Papel Amate


Finally on a couple of weeks holiday and ready to start putting up my first blogs and the fantastic art work my students created
Our theme in the first term middle grades has been Celebration and in particular Latin America. I discovered the paper cutouts of the villages in the Otomi Community San Pablito in the Sierra Norte in Puebla.- the following links provides the essential information
See below the artworks my students made.
How to make them
Brown paper A4
Wax candle
Clothes iron
Black A3 cart for display
Glue
Brown edicol dye or food colouring
Basic template of figure

Step 1
Fake Amate Paper

Rub brown paper with wax candle using it ion its side. Ensure a good waxy coverage.
Crumple paper well to crack the wax coating. Open out and smooth ready to dye. Dye with brown dye and iron flat between two layers of newspaper.

Step 2
Paper Cutting
Create the figure using a strong piece of card see template .
Fold the brown paper in half lengthwise. Fold dyed side to the inside and trace the figure onto half the paper. Add the extra shapes which could be fruit shapes , leaves animals etc- check website for ideas. I printed out lots of examples for students to use.
Carefully cut out keeping paper folded to create symmetrical figure.
Glue onto black paper for display.


`