Search This Blog

Saturday, September 25, 2010

Cute clay owls


I have just finished gluing paper clips on the back of my kids cute clay owls. I found the technique at http://4crazykings.blogspot.com/2009/04/how-to-make-quick-clay-owl.html. It was very easy and fast. Once fired they were coloured with crayon and then brushed with Sumi-e ink. Hope you find this lesson a great 3D addition to your 2D owl lessons.

Friday, September 24, 2010

Check Out a couple of my older posts re Wild Things and Bird Houses

I have just updated a couple of older posts with some photos. I am so delighted with the results of the kids art. The clay work is fantastic. I will upload some new work over the next week or two as I enjoy a small break mid semester.

Thursday, August 26, 2010

Warhol Cats Years 1/2


I have just finished mounting the cat drawing and paintings my 1/2s made earlier this year - the exhibition is only 8 weeks away and hence the need to get as much mounted and velcroed before we break in 4 weeks time before the onset of 4th term and the craziness it brings. Inspiration for this book was the beautiful cat drawings 'Sam' by Andy Warhol. After reading the children the book Uncle Andy's Cats by James Warhola I handed out examples of his cat drawings. They drew them so beautifully in their art diaries. We then drew over them with a black fine line Pen. I photocopied them onto quality paper as they were just so good. They then painted the p/copies with tempera paint - in similar colours to Andy Warhol. They just didn't look complete- so we finished them using Sumi -e ink and chinese calligraphy pens ( very cheap on Ebay). Check out the results- remembering these kids are only 7 and 8 years old.

Tuesday, August 10, 2010

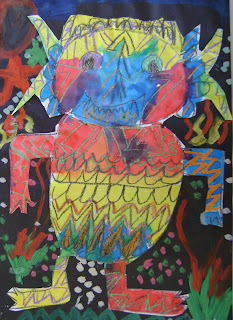
Where the Wild Things Are 2D and 3D Art -Brilliant


The Classic Children's Book Where the Wild Things Are is a fantastic starting point for a combined Literacy and Art Lesson. I have 6 classes all in the early Childhood part of the school ranging over 3 different ages groups. We have mainly split classes ie Year 1/2 or 2/3 which makes planning and how to cover something these students didn't have the previous year. Solution I do not repeat any lesson for quite a few years.
So I began the lesson with my year 3yrs and here is their results- just awesome. We used black crayon to draw the main shape, green, orange and purple crayons to add pattern. We then used the complementary colour dye to complete the Wild Thing. The monster was cut out. We painted the black backgrounds with acrylic paint mixed with a little white to add opacity. When dried we glued on the monster. Year 2/3 . Same monster idea but this time we used tempera paint on the black paper. Much more effective.Year 1/2 Same monster idea but we used oil pastels on green, purple or orange paper. _ - effective but students did not use the oil pastels well very smudgy and rather scribbly.
Last group 2/3- more of a challenge. We cut out our monsters from plain coloured card and then used the complementary colour as patterns which we cut from scrap card. The students then used colour burst pens to further embellish their monsters. The back grounds???? More to come on these ones.
Year 3 Children have now made the Clay Wild Things - We have now started our 3D clay monsters using pinch pot hollow forms. These kids are really going to enjoy this. The Clay Wild Things are a fantastic success. We use crayon to colour the clay- yes!! It was a technique I saw in one of the Art Education magazines I will follow this up and attribute it to the wonderful art teacher who wrote up the technique- Who needs to glaze? It takes up too much time and cost.
-To finish we used Sumi-e ink- I assume Indian ink might work but the sumi-e has I lovely shine to it. It is simply brushed over it . Make sure the kids apply the crayon as hard as possible to get a good solid coverage- if it is done too lightly the black ink overpowers the colour.
Thanks to the world of blogging- I have learnt so much this year - and it has certainly inspired me.

Monday, July 12, 2010

Bird Houses 2D and 3D Grade 2/3


I loved the gorgeous bird houses Patty Palmer had on her blog Deep Space Sparkle. So we created our own. We dyed our backgrounds with edicol ( food colouring). The Bird houses were painted with tempera paint block paint and finished them with sumi-e ink.
I alway love to make 3D artworks with the students and so came up with the idea of using a milk or juice cartons . I trimmed the top of and retaped them to create the bird house shape. I cut and glued a seperate roof onto the top of the carton . ( this takes up quite a bit of time as the students cant do this. I had the help of a high school student who is in work place training. Using a very thick white acrylic paint painted the cartons white. The students then painted and decorated them in bright tempera paints. . My next problem to solve was how to display them- I have come up with two ideas. Using very large Popsicle sticks ( more like tongue depressors) which are set in a plastic cup of plaster- a hole is cut in the bottom of the carton just big enough for the tongue depressor. They may require gluing using a hot melt glue gun to hold in place. This is suitable for small cartons. The large ones I have decided to hang for display with fishing line.

Tuesday, July 6, 2010

Mini Miros Yr 2/3s, 7- 8years age


Ever have one of those days you don't know what to do. Searching through my favourite blog sites I came across an art lesson on Joan Miro- posted on Deep Space Sparkle.
Not many materials required, art appreciation included and just enough time to get started. I have some good resources I collected over the years including calendar images which I purchase in February when they go out at least 1/2 price and when my friend who has a calendar shop gives me the ones she has not sold for free. I had great memories of the fantastic retrospective exhibition of Miro's held at the Centre Pompidou Art Gallery in Paris in 2004. It was the highlight of my trip along with Monet,s garden which was blooming in May. The children had lots of fun creating their drawings in draft form on cartridge paper and using felt pens. I searched my storeroom and found some offcuts of Mattboard used for making picture matts/frames. I cut up enough for each student and handed out black fine liners to the children. They drew their lovely whimsical characters and other little icon Miro shapes such as stars, suns, moons and eyes. To colour the main shapes I handed out metallic markers and the Faber Castell Colour burst pens for them to complete their works. I then mounted them onto to some black card for display. The photo shows some of them as display at our annual district art display ART BLAST - which showcases the artwork of thirty primary and secondary schools.

Graduation Canvas Year 7/s 12-13 yrs


I began a tradition 5 years ago that when students leave our school to enter high school they create a canvas which incorporates their image and also some graphic work incorporating their name in a unique style and words that may describe them. I started off by photographing them and then Photo shopped their faces into Warhol style black and white images. Originally I would cut stencils but found as the school grew this was too huge a task and now we carefully glue a photocopy of their face onto the canvas.
Over the past few years the project has evolved where now the students have selected their own lettering style- I use Dafont.com as a source for funky fonts. The three examples demonstrate 3 completely different approaches to the canvases and individual style.
To complete the project the students paint the backgrounds with a quality acrylic and I seal with a clear polymer.